TEST PRINCIPLE
Evaluation of the firmness and consistencies of Fromage Frais by penetration using a cylinder probe.
BACKGROUND
Fromage Frais is a fresh cheese made in a similar manner to cheese. However, unlike cheese, the curds are not solidified but stirred giving it a smooth soft texture that is similar to yoghurt. Pure Fromage Frais is fat-free and by the addition of cream, the fat content and flavor is increased. Increasing the fat content in the product produces a softer cheese by weakening the protein matrix as the ratio of protein to fat content decreases.
Texture analysis of Fromage Frais is necessary in order to predict the
final product quality. The CT3 Texture Analyzer can be used to measure the firmness of Fromage Frais using a cylinder probe. As the probe penetrates the sample, the resistance to deformation by the applied stress is measured. The maximum force applied on the sample over a specified distance is a measure of sample firmness and the area under the curve a measure of product consistency.
The adhesive force as the probe retracts from the sample is a measure of the adhesiveness of the product. These parameters can be observed on the graph as a maximum negative peak and the area under the negative peak respectively. Tests are better performed directly from the sample container to avoid tampering with the set condition of the sample. This enables sample testing directly from the production line.
METHOD
| Equipment: |
CT3 with 4.5 kg load cell |
|
Fixture Base Table (TA-BT-KIT) |
|
25.4 mm Cylinder Probe (TA-11) |
|
TexturePro CT Software |
Settings:
| Test Type: |
Compression |
| Pre-Test Speed: |
1. mm/s |
| Test Speed: |
1.5 mm/s |
| Post-Test Speed: |
1.5 mm/s |
| Target Type: |
Distance |
| Target Value: |
15 mm |
| Trigger Force: |
5 g |
PROCEDURE
- Attach the cylinder probe to the instrument.
- Place the fixture base table to the base of the instrument and loosely tighten the thumb screws to enable some degree of mobility.
- Insert the base plate to the fixture base table and tighten into position using the side screws.
- Remove the sample from the place of storage (refrigerator) and place it on the fixture base table.
- Lower the probe so that it is a few millimeters above the sample.
- Position the sample container centrally under the probe by re-positioning the base table.
- Once alignment is complete, commence the test.
- Commence the penetration test.
- When the probe withdraws from the sample, firmly hold the container to prevent lifting.
Notes:
Samples must be tested immediately after removal from storage (refrigerator). Drain off any excess water on the sample surface prior to performing the test.
When comparing different samples, the volume of product and container size should remain the same.
When optimizing test samples, the hardest sample is best tested first in order to predict the maximum testing range for subsequent samples.
RESULTS
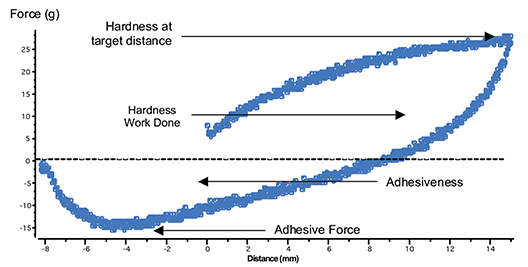
The graphs show the firmness of Fromage Frais using a 25 mm cylinder probe.

Figure I
Figure I shows the firmness and consistency of Fromage Frais tested at room temperature. The maximum force value on the graph is a measure of sample firmness. The area under the positive peak from the start of the test to the maximum force is a measure of work done. The maximum negative peak is a measure of adhesive force. The area above the negative peak is a measure of sample adhesiveness.

Figure II
Figure II shows the load vs distance for the penetration of Fromage Frais using a 25 mm cylinder probe. This is an alternative option for displaying the results. The maximum force value on the graph is a measure of sample firmness. The area under the positive curve from the start of the test to the target distance point (15 mm) is a measure of hardness work done. The maximum negative force value is a measure of adhesive force. The area above the negative curve is a measure of sample adhesiveness.
OBSERVATIONS
When a trigger force of 5 g has been detected on the sample surface, the probe proceeds to penetrate the sample over a specified distance of 15 mm. As the probe penetrates the sample, the force is seen to increase. The maximum force to the specified distance is a measure of sample hardness (firmness), the higher the value the firmer the sample. As the probe returns to its starting position, the adhesive force is measured which is the force required to separate the sample from the probe. The area under the negative peak is a measure of sample adhesiveness.
The table below shows the hardness, hardness work done, adhesive force and adhesiveness values of Fromage Frais:
| Sample |
Hardness (g) |
Work Done (mJ) |
Adhesive Force (g) |
Adhesiveness (mJ) |
| Fromage Frais |
28 |
2.9 |
16 |
1.4 |
>>Download a pdf of this application note.